Product Documentation
Thank you for purchasing Lozand. This documentation is designed to guide you through the process of installing, configuring, and maintaining your new software with ease.
Quick Start
Follow our step-by-step guides for the most popular hosting platforms to get live in minutes.
Legal & Compliance
Software License
Lozand is a software vendor, not a financial service provider. We produce the engine; you operate the platform. You are solely responsible for regulatory compliance.
Usage Restrictions
One license allows one permanent installation on a single domain. Reselling, redistributing, or sub-licensing is strictly prohibited.
Liability & Indemnification
The Lozand Team is fully indemnified from any damages or legal repercussions arising from your deployment or operational decisions.
Refund Policy
Due to the nature of digital goods and unencrypted source code, all sales are final once keys are issued or software is downloaded.
By using this product, you agree to our full Terms of Service.
Purchasing & License
To activate your copy of Lozand, you need a valid License Key. This key is provided to you upon successful purchase and is used to register your domain on our servers.
Where is my key?
You can find your license key in your Lozand Account Dashboard under the "Licenses" tab or in the confirmation email sent after purchase.
Software Installation
Choose your hosting provider below for specific step-by-step instructions. We recommend high-performance shared hosting or VPS for the best experience.
Need Professional Installation?
If you're busy or find the installation process complex, our expert team can handle the entire setup for you. We ensure zero errors, optimized server settings, and a fully production-ready platform.
Shared (cPanel/hPanel)
$30
Cloud/VPS Hosting
$150
cPanel Hosting
Namecheap & Similar
Prepare Your Files
Download the core files from your Lozand dashboard. Simply log in to your account, navigate to "My License Keys" and click the Download button.
The installer will
automatically
handle
public/storage symlinking during the setup process.
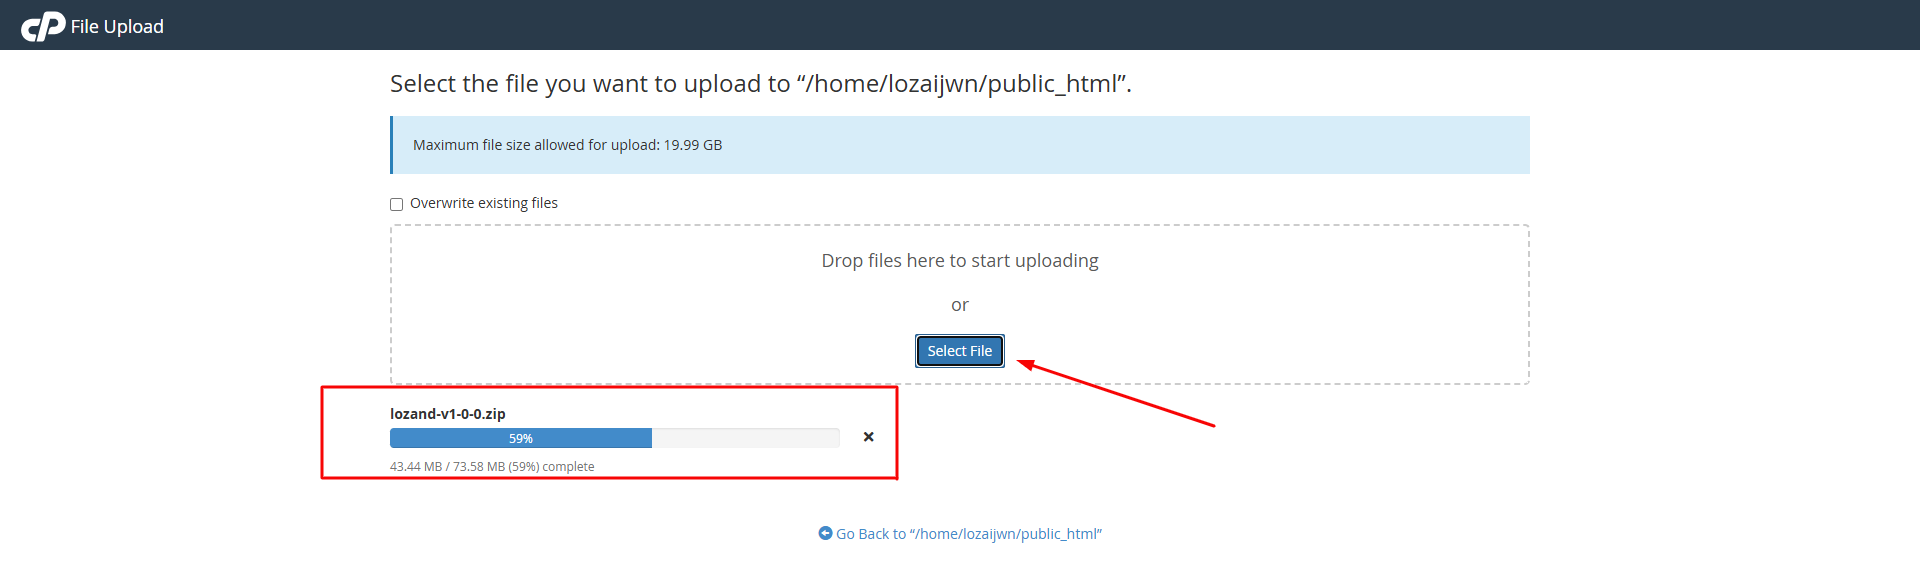
Upload and Extract
In cPanel File
Manager, navigate to public_html (or your
subdomain
folder). Upload the zip file and extract its contents.
File manger screenshot below

Uploade Screenshot below
This will extract the files to
[domain_root]/lozand. Navigate to
[domain_root]/lozand/Files.
Ensure "Show Hidden
Files" is enabled in File Manager settings to see the
.env and .htaccess files.

Move all files from
[domain_root]/lozand/Files to your domain's root directory
(public_html).
Double-check that the
.env
and
.htaccess files are present in the root folder.
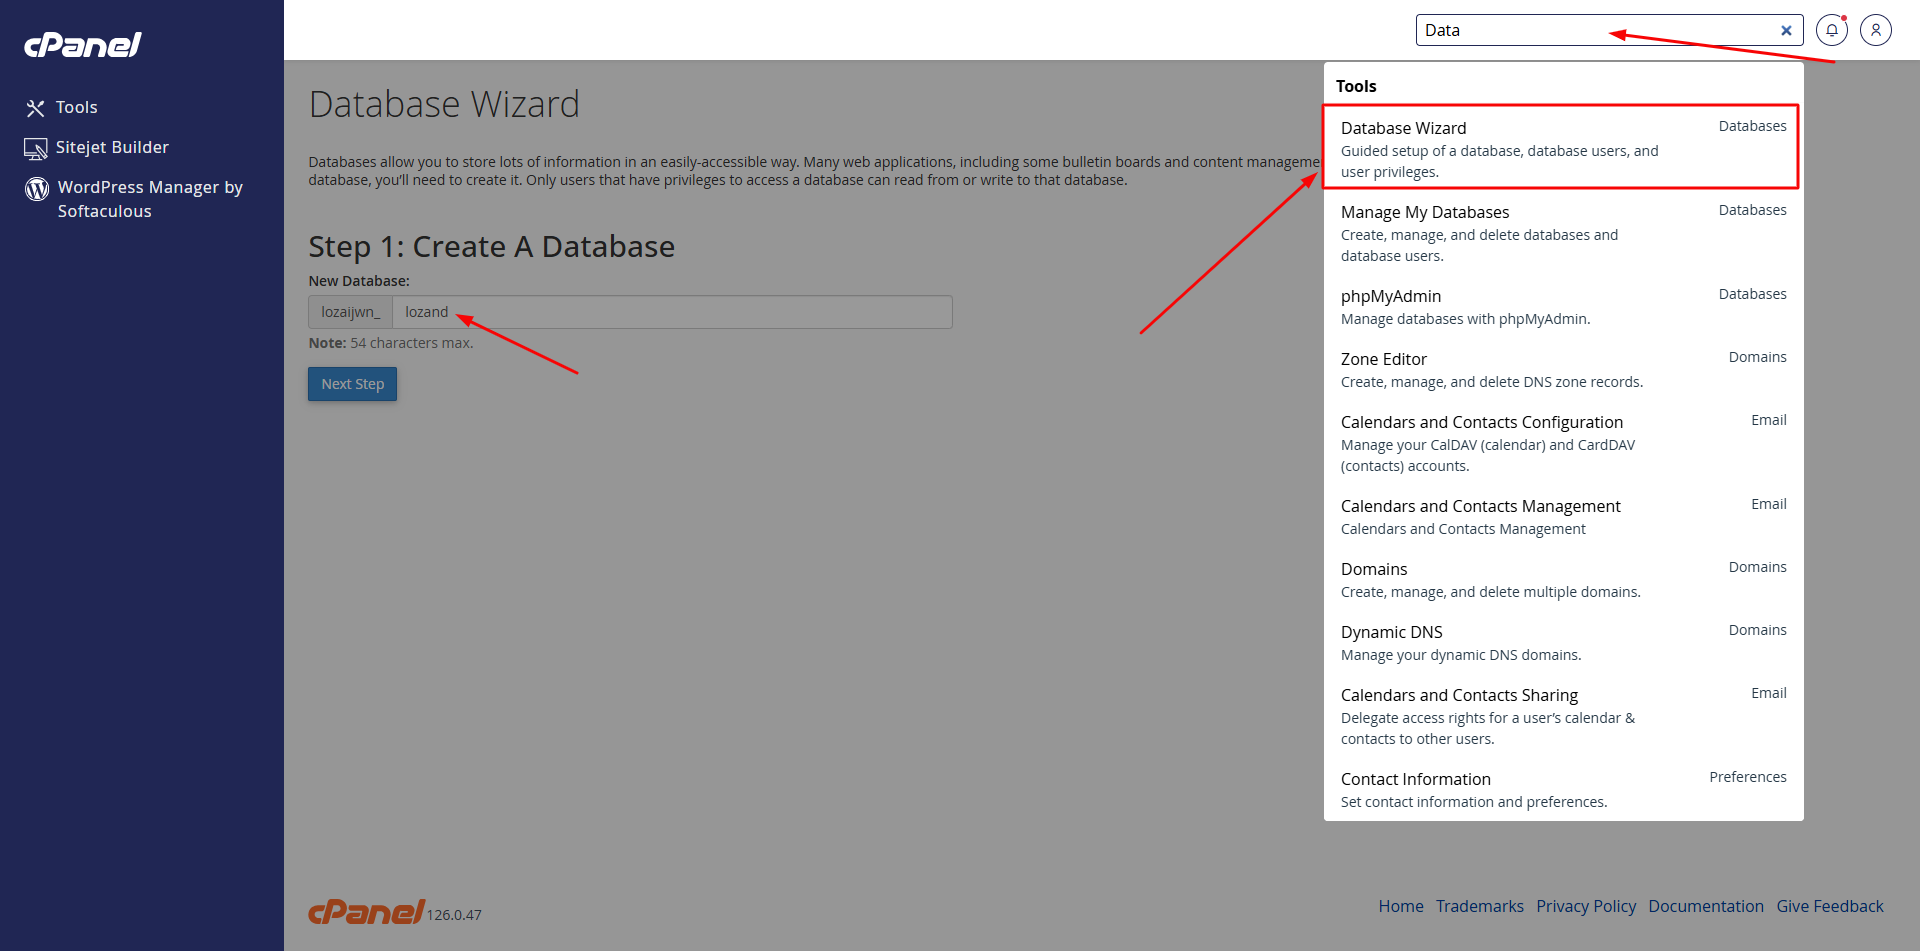
Database Creation (MySQL Wizard)
Open the MySQL® Database Wizard in cPanel and follow these essential steps:
1 Create Database & User
Enter a name for your database and user. Generate a secure password using the built-in generator and save it securely.
Important: Save Your Credentials
Keep your Database Name, Username, and Password ready. You will need them for the final Web Installer step.
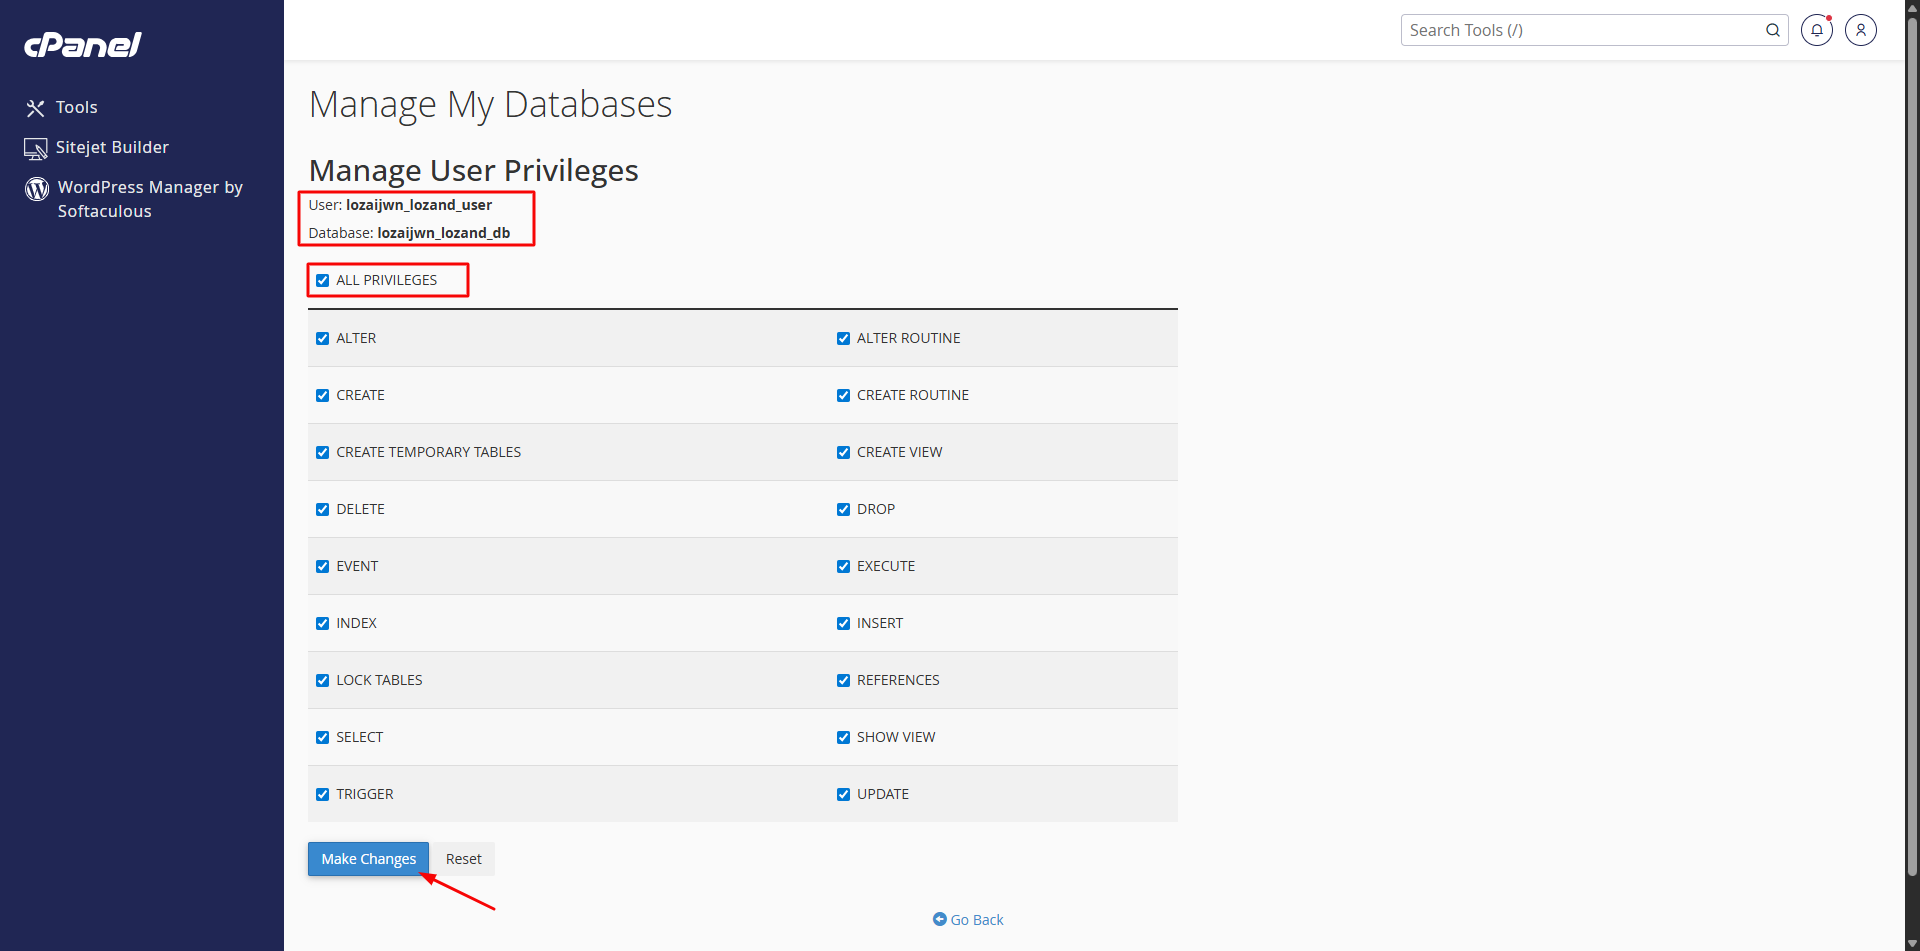
2 Assign Privileges
On the final wizard step, select "ALL PRIVILEGES" and click "Make Changes" to complete the setup.
Run the Web Installer
Finally, visit
yourdomain.com/install in your browser. The web wizard will
guide
you through the automated setup—just paste your saved database
credentials
when
prompted.
Hostinger (Hpanel)
Optimized Cloud Hosting
Installation Workflow
-
01
Upload and extract your zip file using Hostinger's File Manager.
-Hostinger requires you to enter a default extract folder, type "extract"
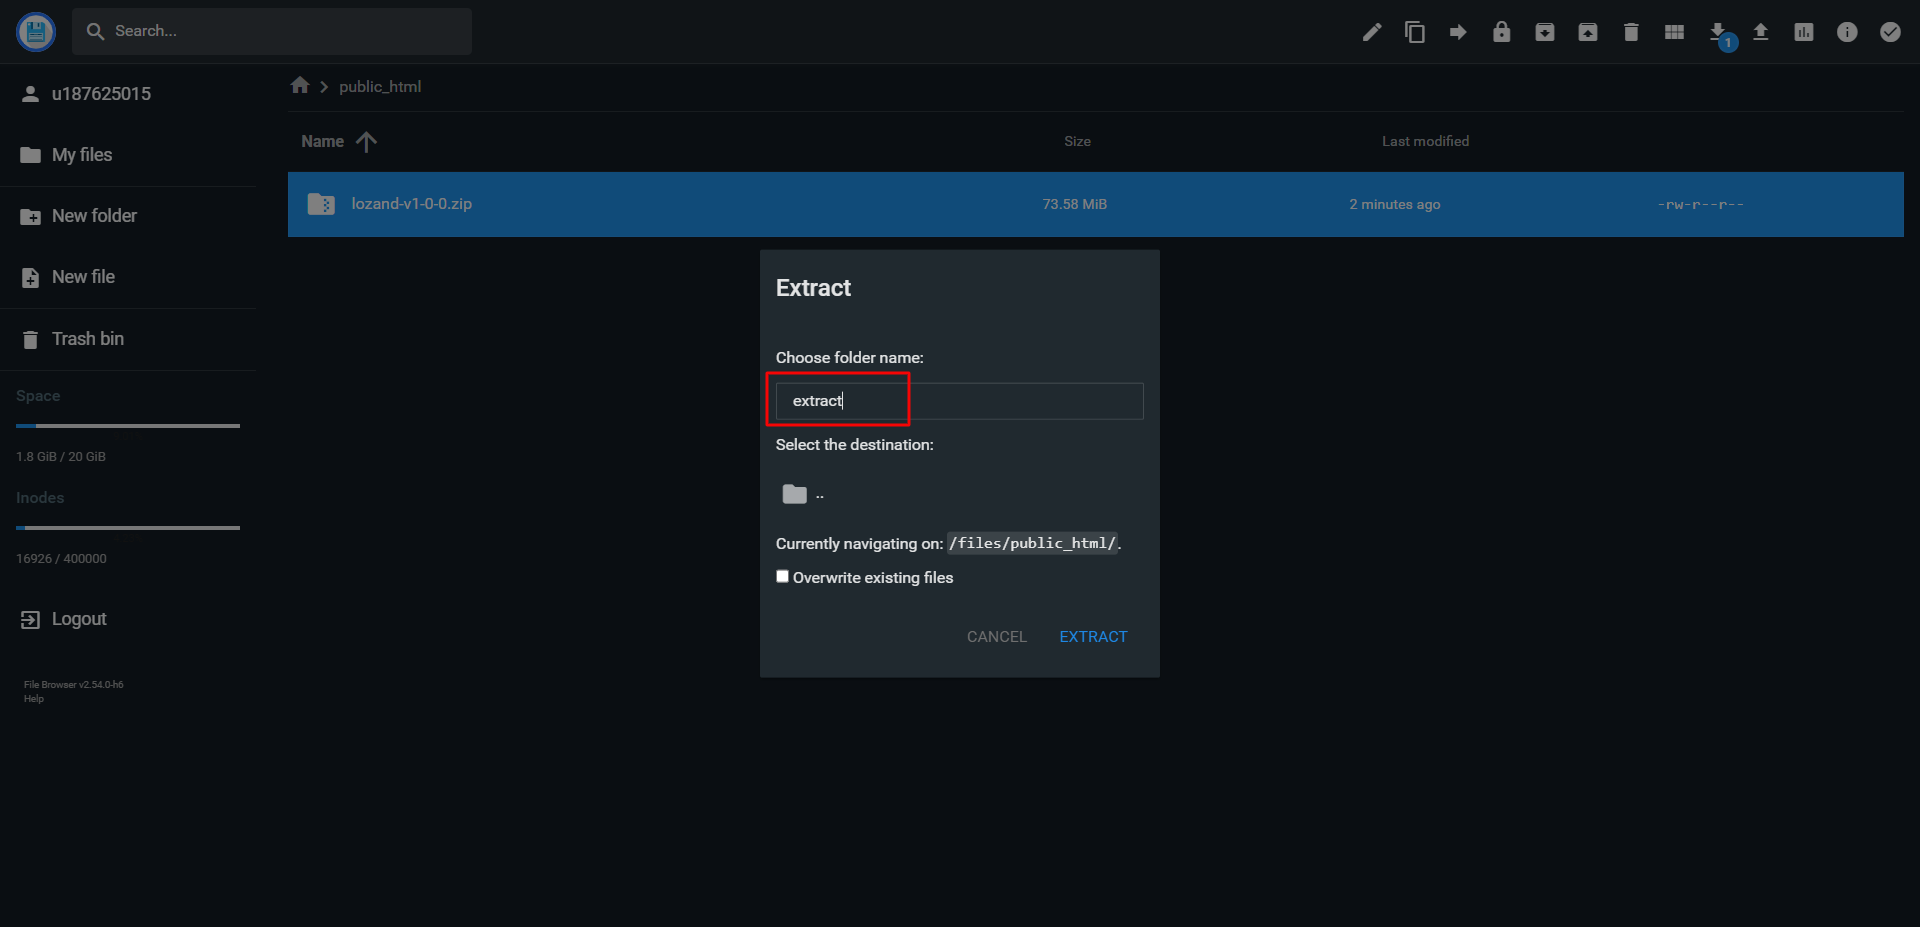
This will extract your files to
public_html/extract/lozand/Files/. Navigate to this directory and move all files to thepublic_html/ -
02
Create Database
Go to Databases → MySQL Databases. Create a database name and a user.
Important: Copy the full Database name (e.g.
u123456789_db) and User name. Hostinger often adds a prefix. Save these and the password securely. -
03
Execute the Lozand installer at
yourdomain.com/install.
Web Installation Steps
Final Configuration Wizard
Requirements & Extensions
Lozand requires PHP 8.3 or higher and several specific extensions to be enabled on your server.
cPanel (Namecheap)
Search for
"Select PHP Version". Set version to
8.3 and ensure all required extensions (bcmath, curl,
gd, etc.) are checked in the list.

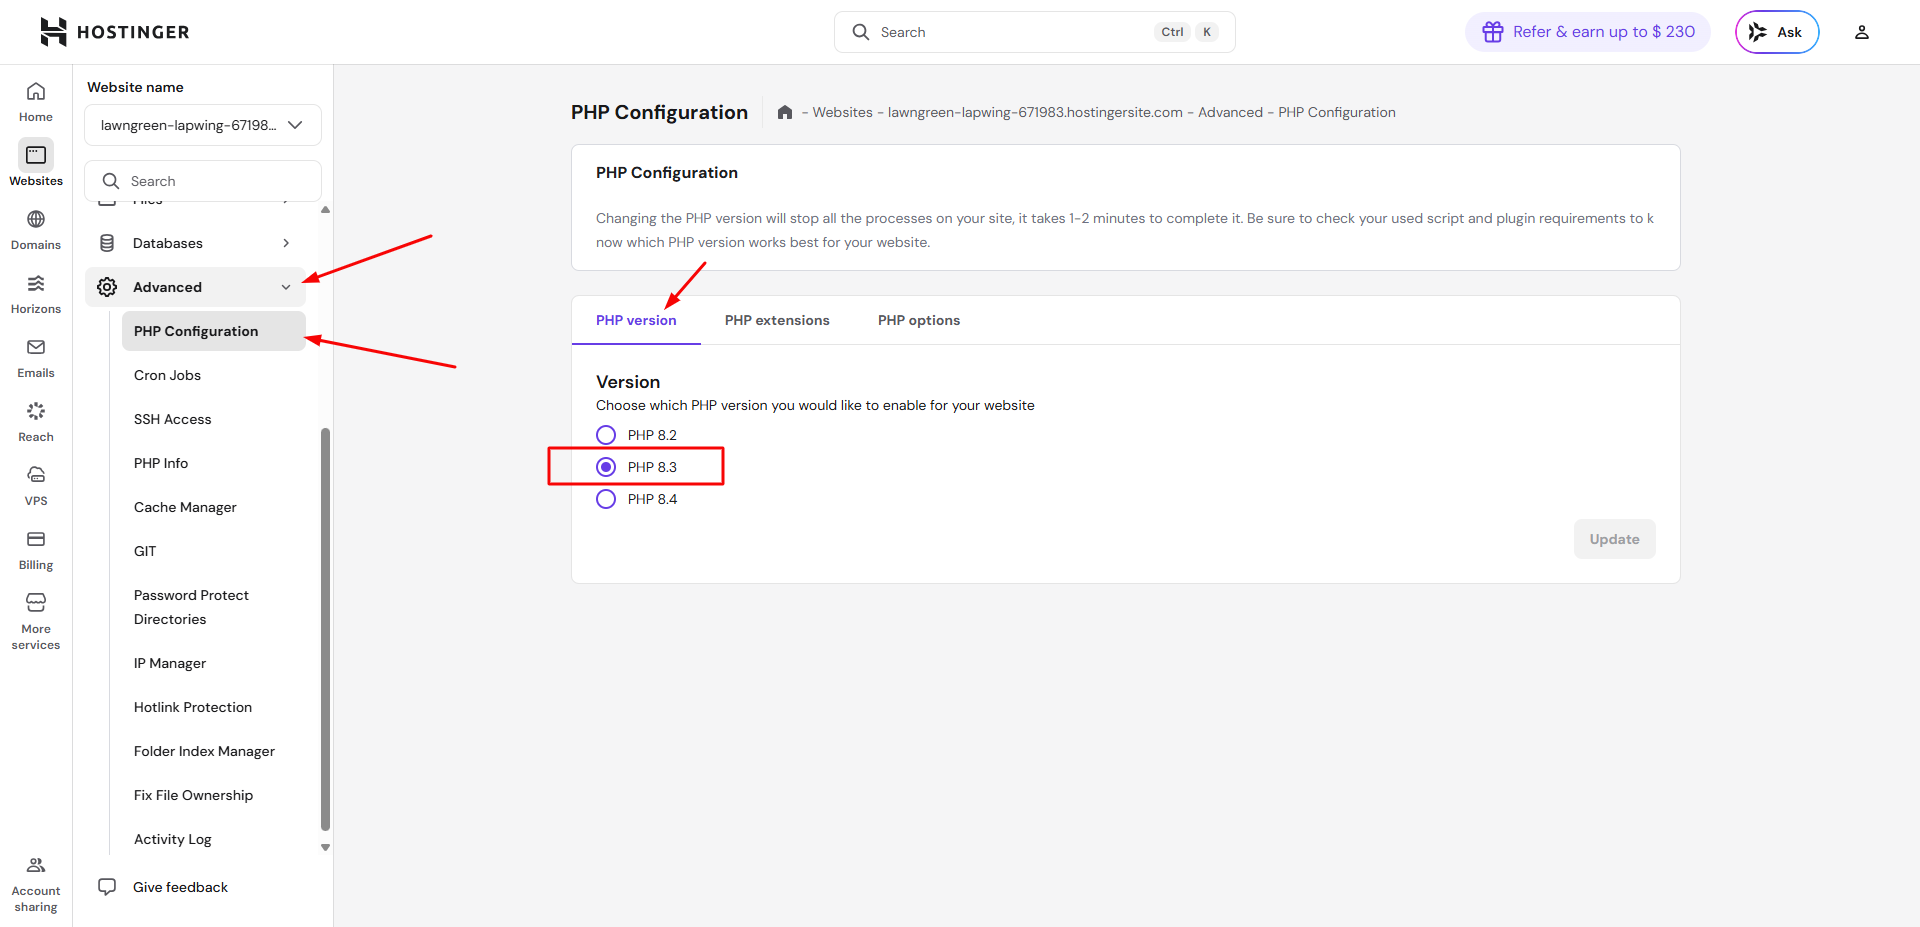
Hostinger (Hpanel)
Navigate to
Advanced → PHP Configuration. Select
PHP 8.3 and click Update. Use the **PHP Extensions**
tab to enable missing ones.
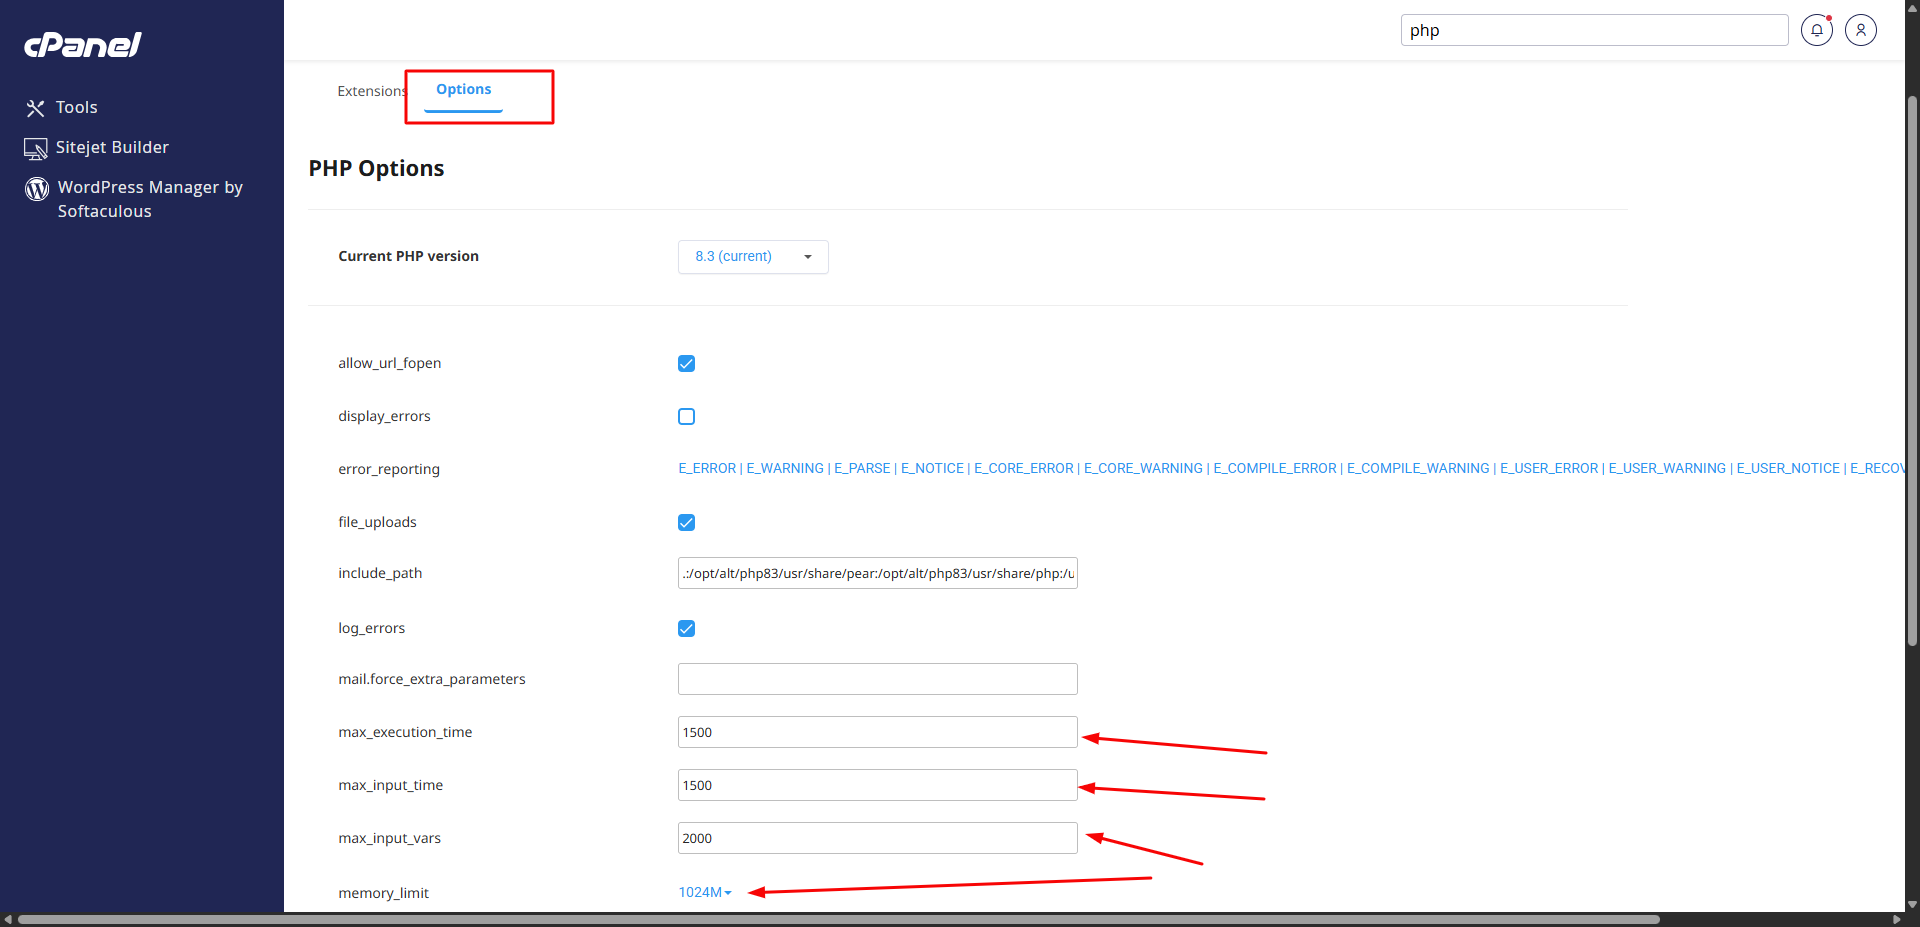
Server Configuration
Optimizing your
php.ini constants is crucial for smooth updates and large file
uploads.
The values are listed on and validated on the page
Where to find these settings?
- cPanel: Select PHP Version → Options tab. Locate and update values.
- Hostinger: PHP Configuration → PHP Options tab. Update and save changes.

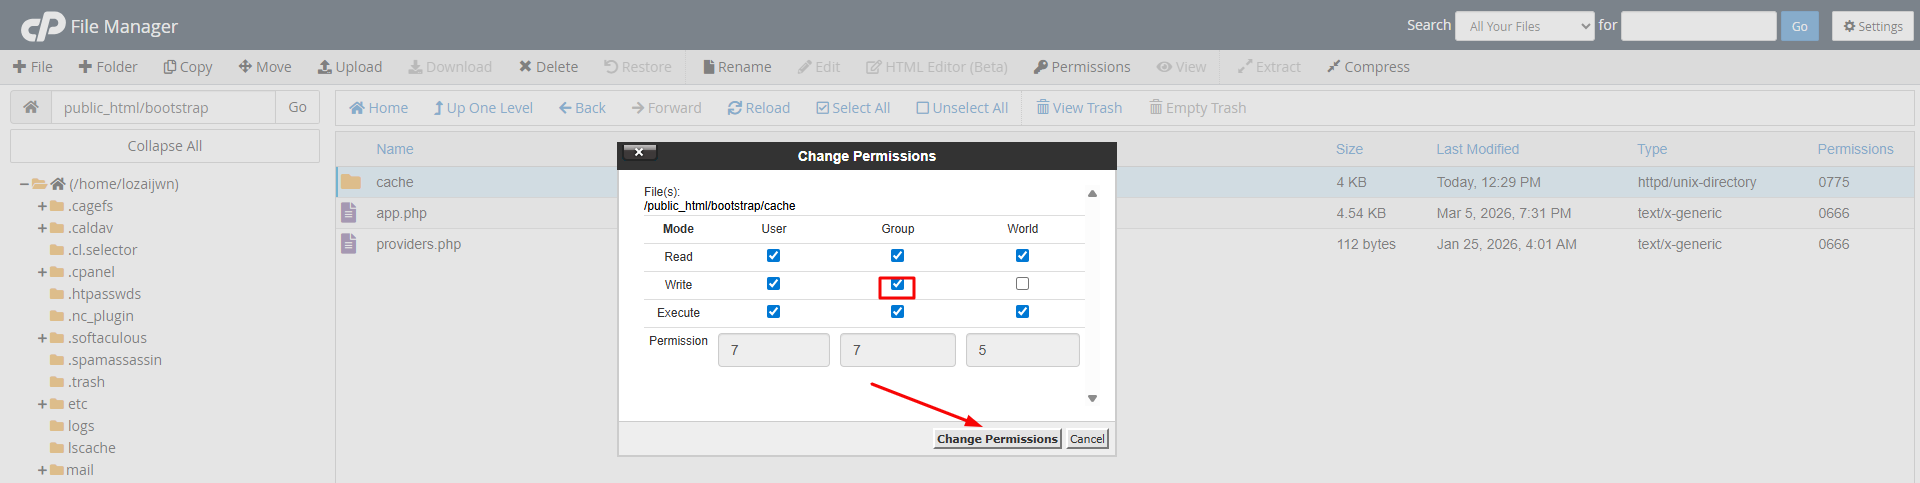
Environment Validation
The first critical step is ensuring Strict File Permissions (775) for the following directories:
storage
Required: 775
storage/framework
Required: 775
storage/app
Required: 775
storage/debugbar
Required: 775
storage/untranslated
Required: 775
storage/logs
Required: 775
bootstrap/cache
Required: 775
How to Change Permissions (cPanel/hPanel)
- Right-click the folder in File Manager.
- Select "Permissions" or "CHMOD".
- Set the value to
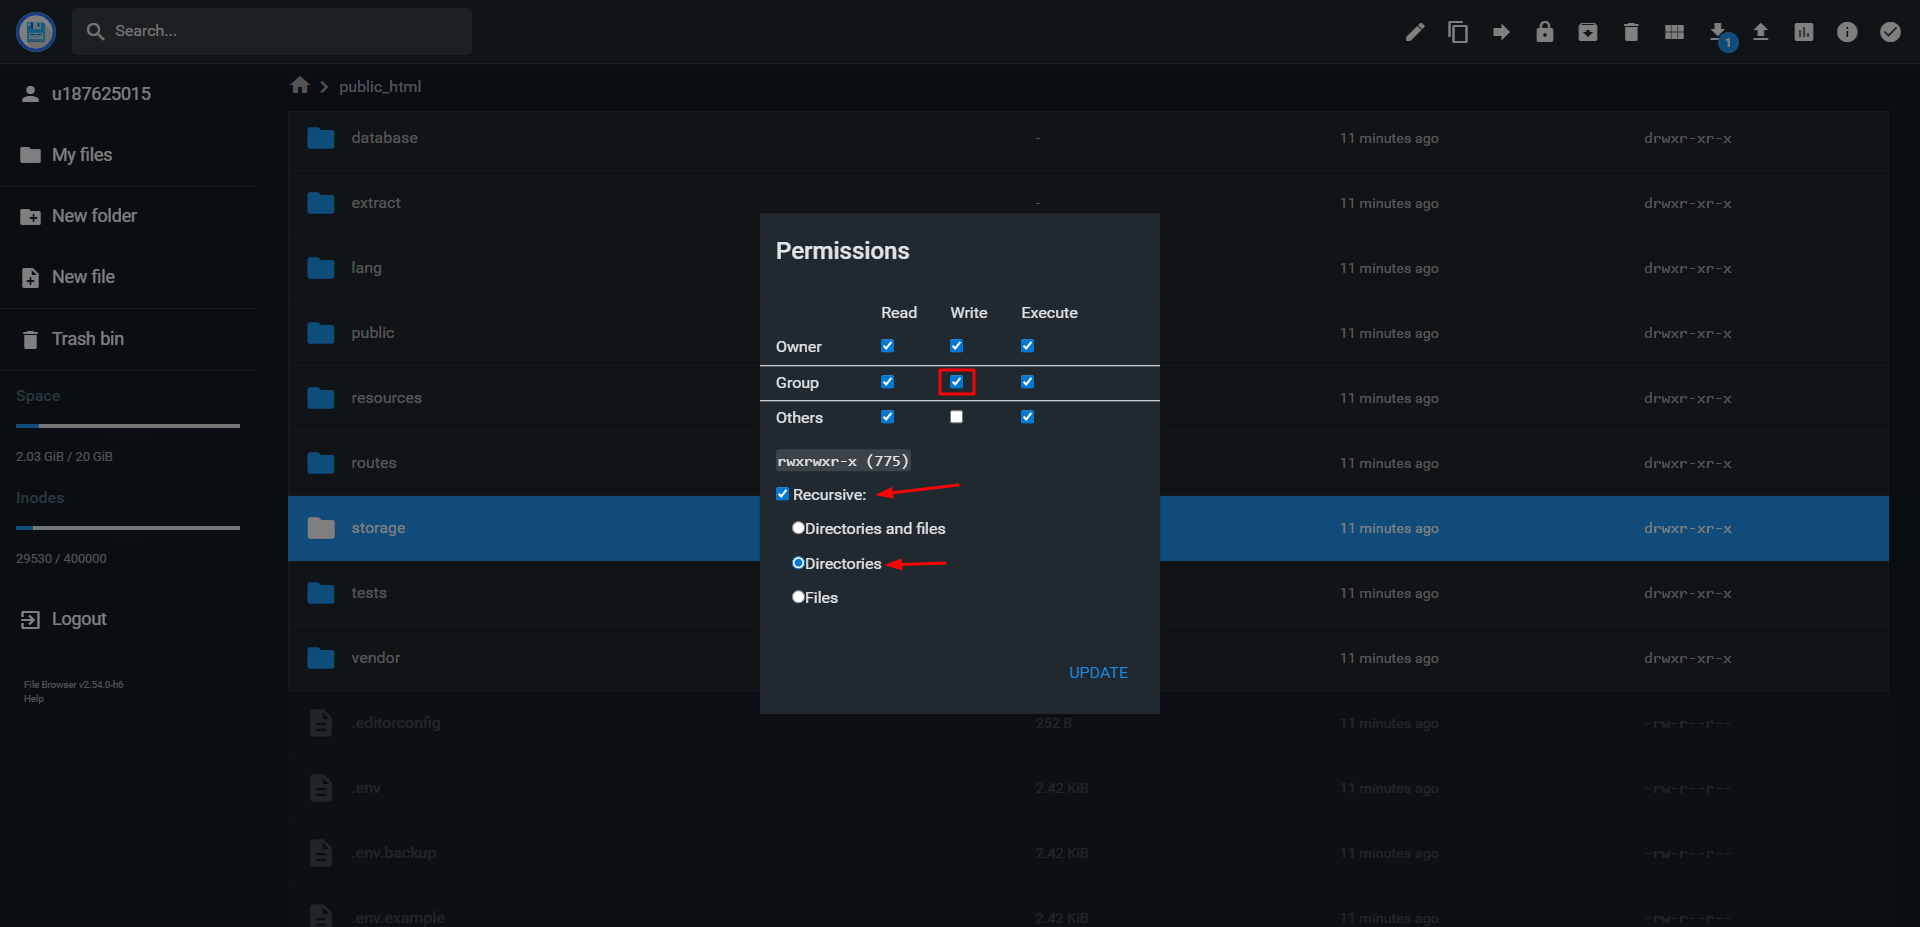
775. Note: 755 will not work. - Ensure "Recurse into subdirectories" is checked if available.
- ON HPANEL

Files & PHP Functions
Certain PHP functions must be enabled for features like System Updates and Storage Linking to work.
Required: Symlink Support
Ensure
symlink is not in your
disable_functions list. This is required to link your
assets correctly.
In cPanel:
Go to PHP Options and check the
disable_functions field. Remove symlink if
present.
In Hostinger:
Navigate to PHP Configuration →
PHP Options. Ensure symlink is allowed/enabled.
License Activation
Paste your Product Key into the field provided. You can find this key in your Lozand Account Dashboard or your purchase confirmation email.
Note: Your server must have an active internet connection to communicate with our licensing server for verification.
Database Configuration
Enter the MySQL credentials you created earlier via the Database Wizard. This allows Lozand to build your system's tables.
Database Host
localhost / 127.0.0.1
Database Port
3306
Database Name
{your_db_name_created_earlier}
Username
{your_db_user_created_earlier}
Password
{your_db_password_of_user}

Finalizing Admin Account
The final step is to create your primary administrator account. Choose a strong password and a valid email address, as this will be used for all sensitive system updates.
Installation Complete!
Lozand is now ready to use. You will be automatically redirected to your brand-new admin dashboard.
Updater System
Keep your platform secure & modern
The Lozand platform features a
sophisticated,
5-stage automated update engine. This ensures your system remains at the cutting edge of
security and performance with minimal manual intervention. Access this via
Admin Dashboard > Update.
Automated Update Workflow
Ecosystem Diagnostics
Verifies PHP 8.3+, required extensions (BCMath, Ctype, Fileinfo, etc.), and server variables (Memory Limit, Exec Timeout).
Secure Acquisition
Downloads compressed update assets directly from our secure central node using your encrypted license key.
Package Sanitization
Our intelligent cleaner
preserves
your .env file, custom logos, and user uploads
while
replacing system core files.
Database Migration
Automatically runs necessary schema updates to ensure your data structure matches the latest feature requirements.
Final Initialization
Clears system caches (Artisan Optimize), increments the version number, and redirects you to the live dashboard.
Proactive Security
Read-Only Safety
The updater uses a temporary extraction zone to prevent site downtime during the download phase.
Rollback Ready
Always perform a full database backup via cPanel before major updates as a standard safeguard.
Automatic Version Increments
Core Settings
Platform Identity & Localization
The Core Settings section allows you to
define
the
fundamental identity and regional configurations of your platform. Access this via
Admin Dashboard > Settings > Core Settings.
Identity & Branding
- • Site Name: Your portal's display name.
- • Logos: Support for both **Square** and **Rectangular** types.
- • Favicon: Browser tab icon (recommended 32x32).
Regional Config
- • Timezone: Critical for transaction timestamps.
- • Currency: Symbol and ISO code (e.g., USD, $).
- • Office: Physical address for invoices & footer.
Binso.io API
Authorize your server for data access
Login to Binso
Navigate to binso.io and login to your account.
My Subscriptions
In the dashboard sidebar, click on the **"My Subscriptions"** menu item.
Access API Settings
Click the chevron icon > on your active subscription, then click **"API Setting"**.
Whitelist Server IP
Click **"Add New Address"**, paste your server IP, and click **"Save Configurations"**.
Your Server IP
19**********64
API Key Configuration Required
Get your Binso API Key from binso.io. This is used for market prices, stocks, futures, margin, etc. The system requires it for functionality.
Testing Mode
You can use the following key for trial purposes:
DEMO
5
Days Trial
Note: Subscriptions cover real-time market data across multiple asset classes essential for trading engine operations.
Cron Jobs
Scheduled Processes & Automation
Lozand requires a "heartbeat" cron job to handle interest payouts, deposit verification, and system maintenance. You only need to set up one of the following commands, depending on your hosting provider's preference.
wget
                                            -q -O- https://yourdomain.com/utils/cronjob >/dev/null 2>&1
curl
                                            -s -o /dev/null https://yourdomain.com/utils/cronjob
Developer & CLI Mode
Local Testing & Debugging
If you are working locally or need to manually trigger the cron processes via SSH/CLI, you can use the built-in Artisan command:
php artisan
                                            lozand:initiate-cron
Cron Health Monitor
Real-time Performance Tracking
Track all background operations, execution times, and process status directly within your dashboard at Admin > Settings > Cron Jobs. This monitor ensures your system automation is performing at peak efficiency.
Email Configuration
SMTP & Delivery Services
SMTP Setup Guide
To send platform notifications, you must first configure a valid SMTP account. You can manage this at Admin > Settings > Email.
How to Create SMTP in cPanel
- Login to your cPanel.
- Navigate to Email Accounts.
- Click + Create to add a new account (e.g.,
noreply@yourdomain.com). - Once created, click "Connect Devices" to view your Incoming/Outgoing server settings (Host, Port, and encryption).
Configuration & Testing
After creating your account, enter the credentials into the Lozand SMTP fields and save. A "Test Connectivity" tool is available at the bottom of the page.
Send Test Mail
Always send a test email to your personal address to confirm successful delivery.
Email Notification Settings
Email Queueing
Enable this to process emails in the background. Recommended for high-traffic sites to ensure the user interface remains snappy during registration or transactions.
Append Date to Subject
Adds current date/time to email subjects. This prevents Google and other services from "threading" emails, ensuring every notification stands out in the user's inbox.
Notification Types & Behavior
Welcome Email
Sent when sign-up is completed.
Email Verification
Sent during registration.
WARNING: If security verification is enabled, disabling this will block user sign-ups.
Deposit Status
Sent for new deposits or status changes.
OTP (2FA) Code
Sent for security actions.
WARNING: Disabling this locks out users if 2FA is active.
Investment Alert
Sent when investment status evolves.
Withdrawal Status
Sent for payouts or status changes.
KYC Status
Sent for document verification updates.
Referral Reward
Sent when downline users sign up.
Transaction History
Sent for every account movement.
NOTE: High-frequency emails may hit quota limits.
Stock/ETF Trades
Sent for purchase or sale of assets.
Account Ban/Unban
Sent for administrative actions.
Built-in Template Editor
Lozand features a powerful code editor directly in the dashboard. Scroll to the bottom of the Email Settings page to see all available templates. Click **"Edit"** next to any item to customize its HTML content, styling, and variables.
Deposit Settings
Payment Inflow & Gateways
Global Configuration
The lowest amount a user can deposit.
The highest amount a user can deposit per session.
System fee applied to every successful deposit.
Time before an unconfirmed deposit is automatically canceled.
Manual Payment Gateways
Bank Transfers & Custom Methods
Manage custom payment methods like Bank Transfer, Mobile Money, or Crypto Wallets at Admin > Settings > Deposits.
- • Toggle: Instant on/off switcher.
- • Edit: Update instructions & details.
- • Delete: Remove obsolete methods.
Scroll to the bottom of the Manual tab and click "Add New Manual Gateway" to create a custom provider.
Automatic Gateways
Instant Verification Providers
Management Rules
-
Edit and Toggle on/off support available for all providers.
-
Automatic gateways cannot be deleted as they are system-integrated.
Featured: Nowpayments Setup
1. API Configuration
Click Configure and enter your credentials from your nowpayments.io account:
- • API Key: Primary connection key.
- • IPN Secret: Required for secure payment callbacks.
2. Gateway Information
- Display Name: Set the name visible to users (e.g., "Pay with Crypto").
- Logo: Add a custom logo or leave default. (Tip: Use worldvectorlogo.com for high-quality assets).
3. Currency Management
This section lists all supported cryptocurrencies. You have granular control to Enable only the coins you wish to accept (BTC, ETH, USDT, etc.) and disable others.
Withdrawal Settings
Payout Controls & Limits
Global Configuration
The lowest amount a user can request for withdrawal.
Processing fee applied to every withdrawal request.
Total maximum withdrawal amount permitted per user per day.
Automatic Withdrawal (NowPayments)
Merchant Setup Guide
Follow these mandatory steps to enable automatic payouts
Activate Custody Mode
Enable Custody mode in your NowPayments account to allow balance management for payouts.
Watch Video TutorialIP Whitelisting
Whitelist your server IPs in Settings > Whitelist to authorize automatic API requests. Click an IP to copy.
19**********64
19**********65
82******.4
Disable Address Lock
Navigate to Settings > Whitelist > Addresses and disable Address Whitelisting to allow sending to any user wallet.
Need help? NowPayments provides 24/7 live chat support on their website.
Visit NowPayments Support →API Configuration & Security
Enter your credentials: API Key, IPN Secret, Nowpayment Login email, Nowpayment Password, and 2FA Secret.
IMPORTANT: These values are encrypted before being stored. Modifications must be done via the Admin UI; editing the `.env` file directly will not work.
Livechat & Scripts
External Tools & Custom JS
Third-Party Widgets
Paste your chat widget
code in
the Live Chat Scripts area. It renders just before the
closing </body> tag.
Add your tracking pixels
and
G4
codes in the Header Scripts section within the
<head> tag.
Any additional custom CSS or JavaScript for the footer should go into the Footer Scripts area.
Social Login
OAuth & Single Sign-On
Master Selection & Navigation
To configure social login methods, navigate to Admin Dashboard > Settings > Login Method. From here, you can enable or disable each provider and input your developer credentials.
Google
Setup Guide
Facebook
Setup Guide
GitHub
Setup Guide
Twitter (X)
Setup Guide
LinkedIn
Setup Guide
GitLab
Setup Guide
Bitbucket
Setup Guide
Email (OTP)
System Enabled
Step-by-Step Provider Guides
Google OAuth Setup
Go to the Google Cloud Console and create a new project.
Navigate to APIs & Services > Credentials. Click "Create Credentials" and select "OAuth client ID".
Set application type to "Web application" and add your Authorized redirect URI (copy it from Admin Settings).
Facebook Login Setup
Login to Meta for Developers and create a "Consumer" application.
Add the "Facebook Login" product and configure "Valid OAuth Redirect URIs" in its settings.
Retrieve your **App ID** and **App Secret** from the App Settings > Basic dashboard.
GitHub OAuth Setup
Go to GitHub Settings > Developer Settings and click "New OAuth App".
Fill in your app details and set the **Authorization callback URL** to the one found in your Admin UI.
Copy the **Client ID** and generate a new **Client Secret** to enter into the Lozand Admin panel.
Twitter (X) Setup
Visit the X Developer Portal and create a new Project & App.
Enable **OAuth 2.0** in User authentication settings and set the Type to "Web App".
Add the Lozand callback URL to the "Callback URI / Redirect URL" field and save.
LinkedIn Auth Setup
Head to LinkedIn Developers and create a new application.
Under the "Auth" tab, add your Lozand callback URL to the "Authorized Redirect URLs" section.
Add the "Sign In with LinkedIn" product to your app to enable the necessary scopes.
GitLab Auth Setup
In GitLab, go to **User Settings > Applications** and create a new application.
Add your callback URL and enable the `read_user`, `openid`, `profile`, and `email` scopes.
Save to get your **Application ID** and **Secret**, then add them to the Lozand Admin panel.
Bitbucket OAuth Setup
In your Bitbucket Workspace, go to **Settings > OAuth consumers** and click "Add consumer".
Provide a name, enter your callback URL, and grant Permissions for **Account: Read** and **Email**.
Copy the **Key** and **Secret** to your Lozand Admin to enable Bitbucket login.
Callback URL Setup
When setting up your OAuth app in developer consoles, use the following standardized callback URLs:
Security & Anti-spam
Platform Guard & Bot Prevention
Authentication & Trust
Email Verification
Require users to confirm their email address before accessing platform features. Highly recommended for reducing fake accounts.
Login OTP
Sends a one-time verification code to the user's email during every login attempt. Adds a critical layer of 2FA protection.
Strong Passwords
Enforces complex password requirements (symbols, numbers, mixed case) to prevent brute-force and credential stuffing attacks.
Identity Verification (KYC)
Manage mandatory document validation for users. You can selectively require KYC for specific high-risk actions to maintain regulatory compliance.
Google reCAPTCHA v2 Setup
Official ConsoleCreate Property
Log in to the reCAPTCHA Admin console and register a new site. Choose **reCAPTCHA v2** and select the **"I'm not a robot" Checkbox** option.
Add Your Domain
Enter your domain name (e.g., `yourdomain.com`). Ensure you add both the production domain and any subdomains where the platform is installed.
Copy Keys to Admin
Copy the **Site Key** and **Secret Key** generated by Google and paste them into the corresponding fields in your Admin Dashboard.
Pro Tip: Verification
After saving your keys, log out and visit the registration page to ensure the reCAPTCHA widget appears and functions correctly.
Language Support
Multi-lingual & Localization
Native Language Support
Lozand supports 11 native languages out of the box, including RTL (Right-to-Left) support for Arabic and Urdu. You can manage these at **Admin > Settings > Utilities**.
Missing your language?
If your required language is not currently supported, please contact our implementation team. We can add custom localizations upon request.
Module Management
Core Feature Control
Feature Toggling
Lozand is built with a modular architecture. You can enable or disable core trading and investment modules to tailor the platform to your specific business model. Manage these at **Admin > Settings > Modules**.
Investment
Enables structured investment plans and managed portfolios. Administrators can create flexible investment packages while users invest and track performance.
Crypto Futures Trading
Provides advanced cryptocurrency futures trading with leveraged long and short positions. Real-time execution and risk management tools.
Forex Trading
Unlocks access to global foreign exchange markets, allowing users to trade major, minor, and exotic currency pairs.
Crypto Margin Trading
Allows users to trade cryptocurrencies using margin, increasing market exposure through leveraged positions.
Stock Trading
Enables buying, selling, and portfolio tracking of publicly listed equities with company disclosures and monitoring.
ETF Trading
Supports trading of Exchange-Traded Funds (ETFs), allowing investment in diversified asset baskets across global markets.
Bonds Trading
Provides access to government and corporate bond instruments for stability and predictable returns.
Loan Services
Facilitates digital lending where users apply for loans and manage repayment schedules directly within the platform.
Trading Bot
Allows automated trading through administrator-managed or strategy-based bots executing trades 24/7.
P2P Transfer
Enables instant peer-to-peer fund transfers between platform users with secure internal settlement.
File Manager
Secure server-side file management for administrators, including upload, code editing, and directory management.
KYC Verification
Identity verification workflows for onboarding, document review, and regulatory compliance management.
Menu Customization
Sidebar Layout & Navigation
Structural Layout
Customize the visibility and organization of both Admin and User sidebars. Manage these at **Admin > Settings > Menus**.
Drag & Drop
Instantly re-position any menu item by dragging it up or down the list. The changes are reflected immediately on the platform.
Toggle Visibility
Core menu items cannot be deleted to prevent broken routes, but they can be toggled **ON** or **OFF** at any time.
Adding Menu Items
You can add custom menu items with specific URLs and icons. This is ideal for linking to external resources, sub-pages, or support portals.
Sandbox Mode
Showcase & Client Demos
Showcase Configuration
If you are deploying Lozand to showcase as a sample to potential clients or buyers, you can enable **Sandbox Mode** for a secure, read-only experience.
How to Enable
Open your root `.env` file and modify the environment variable to trigger sandbox restrictions:
Read-Only Mode
The entire platform is placed in read-only mode, preventing data mutation and accidental changes during demonstrations.
Google Login Only
External login methods are restricted. Users can only authenticate using Google Social Login during this period.
Local User Storage
Activity data is stored separately in at: **/storage/sanbox-users.json** for easier cleanup after the showcase.
File Manager
Direct Server File Management
Lozand comes prebundled with an advanced File Manager, allowing you to manage your server assets directly from the admin dashboard without needing FTP access.
Module Activation
You can enable or disable the File Manager system-wide to control access and resource usage.
Location
Admin Dashboard > Settings > ModulesDashboard Access
Once enabled, the File Manager link will appear in your admin sidebar for quick access to your files.
Endpoint
Admin Dashboard > File ManagerSecurity Notice
The File Manager has direct access to your server file system. Ensure only trusted administrators have access to this module to prevent accidental deletion or modification of critical system files.
Code Editor
Integrated Development Environment
Edit your templates, CSS files, and logic directly within the platform using our high-performance integrated Code Editor. No external IDE required for minor tweaks or customizations.
Web-Based Editing
Integrated directly within the File Manager. Simply click any text-based file (PHP, JS, CSS, HTML) to open it in the editor.
Sandbox Protection
The editor automatically disables saving functionality when the system is in **Sandbox Mode** to prevent permanent changes.
Auto-Save Support
Features high-speed AJAX saving to ensure your progress is committed instantly without page reloads.
Files can be found in
resources/views/templates/bento/blades/admin/file-managerfor template-specific management.General & Other Settings
Platform-wide Configuration
Complete Your Setup
While this guide covers the most critical components, Lozand includes dozens of additional fine-tuning options for branding, SEO, notifications, and more.
Explore all configurations
Navigate to **Admin > Settings** to view and modify all remaining system settings.
Custom Solutions & Services
Enterprise Development & Bespoke Engines
Beyond the core platform features, Lozand offers specialized development for institutional-grade trading engines and bots. These can be viewed and requested directly from your Admin Dashboard > Settings.
Polymarket Bot Premium
Custom polymarket bot development with on-chain execution and risk management.
Trading Engine Institutional
High-performance matching engines for Crypto, Forex, and Stock markets.
Blockchain Engineering Enterprise
Custom token creation, smart contract audits, and L2 scaling solutions.
Request Custom Feature
If you need a specific module or integration, our team is available for bespoke development.